SOA 12c - DB Adapter (Perform an Operation on a Table)
Information that you need to know:
Data manipulation language (DML) operations align with basic SQL INSERT, UPDATE, and SELECT operations. SQL INSERT, UPDATE, DELETE, and SELECT are all mapped to Web Service operations of the same name. The MERGE is either an INSERT or UPDATE, based on the results of an existence check. A distinction is made between the data manipulation operations—called outbound writes—and the SELECT operations—called outbound reads. The connection between the Web Service and the SQL for merge (the default for outbound write) and queryByExample are not as obvious as for basic SQL INSERT, UPDATE, and SELECT. For more detailed information read the following URL: https://docs.oracle.com/cd/E28280_01/integration.1111/e10231/adptr_db.htm#CHDFGBGD
In this post, we will learn how create a SOA Project with Database Adapter - Operation Type: Perform an Operation on a TableThe next images are the SOA Project execution:


We are going to open JDeveloper IDE and click on File menu > New > Application.
For example:
On the Application window, set the next values, and click on next button.
| Application Name | DatabaseAdapter |
| Directory | C:\JDeveloper\mywork\DatabaseAdapter |
| Application Package Prefix |
For example:

On the Project window, set the next values, and click on next button.
| Project Name | PerformOperationOnTable |
| Directory | C:\JDeveloper\mywork\DatabaseAdapter\PerformOperationOnTable |
For example:

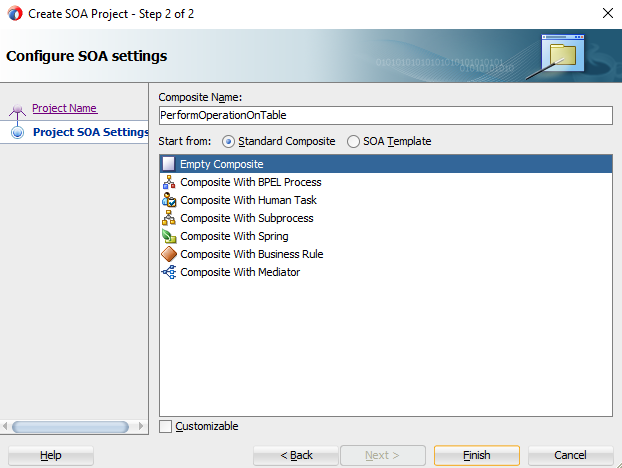
On the Configure SOA settings window, set the next values, and click on finish button.
| Standard Composite | Empty Composite |
For example:
After clicking on finish button, the JDeveloper IDE has the next appearance:

Then the next step, on External References section right click > Insert > Database, then enter the dbPerformOperationOnTable value on Service Name, then click on next button.
For Example:

Select the Oracle JDBC connection, then click on next.
Note: If you need additional information about how create a Oracle JDBC connection click on the next URL: Create Oracle DB Connection
For Example:

Then on Operation Type window, chose the Perform an Operation on a Table option, then click on next button (we keep the same values settings by default).

Then on Select Table window, chose the table that you created, in my case I chose the XXISC_FGG_EMPLOYEES table >, then click on ok button, then next button.
For Example:


Then on Relationships window, we keep the same values settings by default, then click on next button.
For Example:
Then on Attribute Filtering window, we keep the same values settings by default, then click on next button.
For Example:
Then on Define Selection Criteria window, we keep the same values settings by default, then click on next button.
For Example:
Then on Advanced Options window, we keep the same values settings by default, then click on next button.
For Example:
Then on JCA Endpoint Properties window, we keep the same values settings by default, then click on next button.
For Example:
Then on Finish window, click on finish button.
For Example:

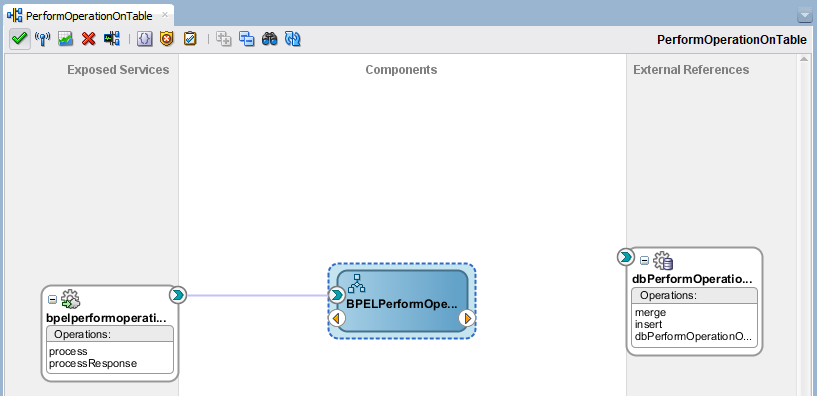
Then the next step, we need to select the BPEL Process component, this component is located on the right side, on Components section, when you found this, select it and drag it to Components section on work area.
For Example:
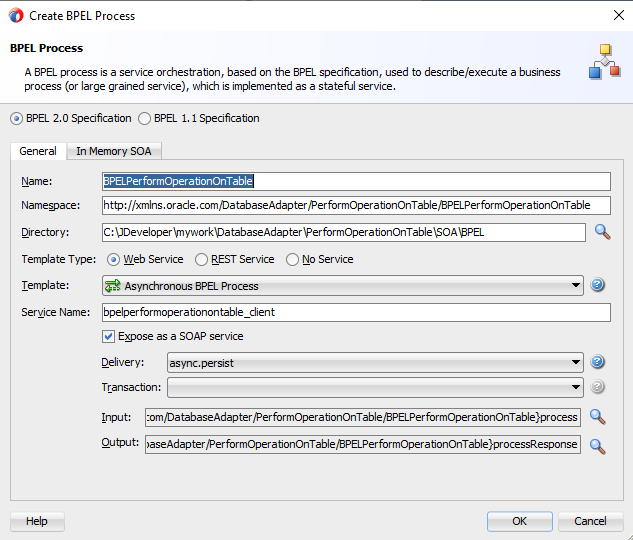
On the Create BPEL Process window, set the next values, and click on ok button.
| BPEL Specification | BPEL 2.0 Specification |
| Name | BPELPerformOperationOnTable |
| Namespace | http://xmlns.oracle.com/DatabaseAdapter/PerformOperationOnTable/BPELPerformOperationOnTable |
| Directory | C:\JDeveloper\mywork\DatabaseAdapter\PerformOperationOnTable\SOA\BPEL |
| Template Type | WebService |
| Template | Asynchronous BPEL Process |
| Service Name | bpelperformoperationontable_client |
| Expose as a SOAP Service | Checked |
| Delivery | async.persist |
| Transaction | |
| Input | {http://xmlns.oracle.com/DatabaseAdapter/PerformOperationOnTable/BPELPerformOperationOnTable}process |
| Output | {http://xmlns.oracle.com/DatabaseAdapter/PerformOperationOnTable/BPELPerformOperationOnTable}processResponse |
For example:
Now we need drag to add a new Reference, with this action we will have available the Partner Links on .bpel file.
For example: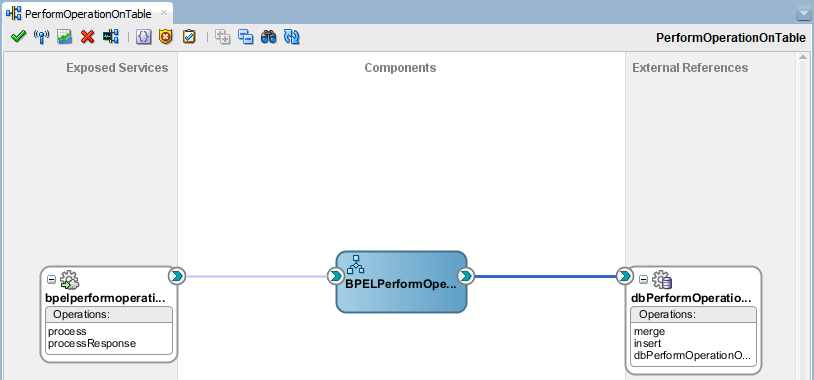
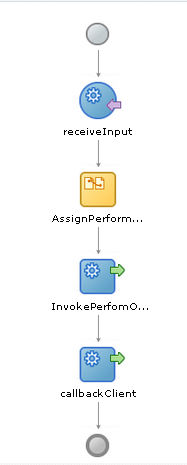
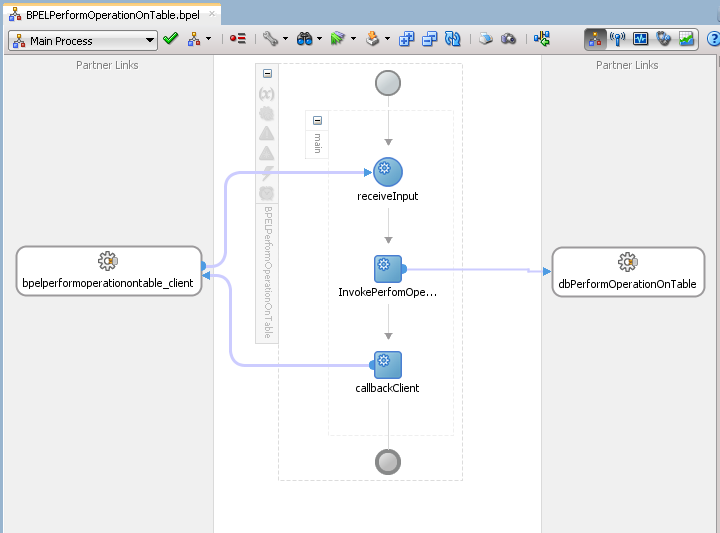
Now we are going to do double click on component: BPELPerformOperationOnTable, then on BPELPerformOperationOnTable.bpel file, we need to select the Invoke activity and drag to work area, just in middle of receiveInput and callBackClient and change the name from Invoke1 to InvokePerformOperationOnTable
For example:

Then we need to drag onto a Partner Link to make a Web Service connection. On the Edit Invoke window, set the next values, and click on ok button.
| Input Variable | dbPerfomOperationOnTableIn |
| Type | {http://xmlns.oracle.com/pcbpel/adapter/db/DatabaseAdapter/PerformOperationOnTable/dbPerformOperationOnTable}XxiscFggEmployeesCollection_msg |
For example:
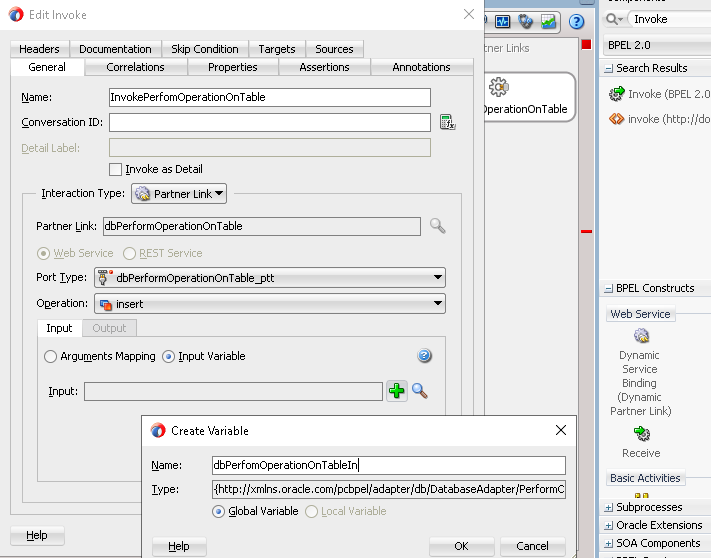
Then click on Apply button, next click on Ok button,then click on Save All button.
Now in this moment we have the Invoke activity to Database Web Service, nevertheless the call don't has any parameters values, having saying that, the next step is assign two values for X and Y variables.
We need to drag the Assign activity to work area between receiveInput and InvokePerformOperationOnTable components.

Then change the activity assign name from Assign1 to AssignPerformOperationOnTableIn.
For example:
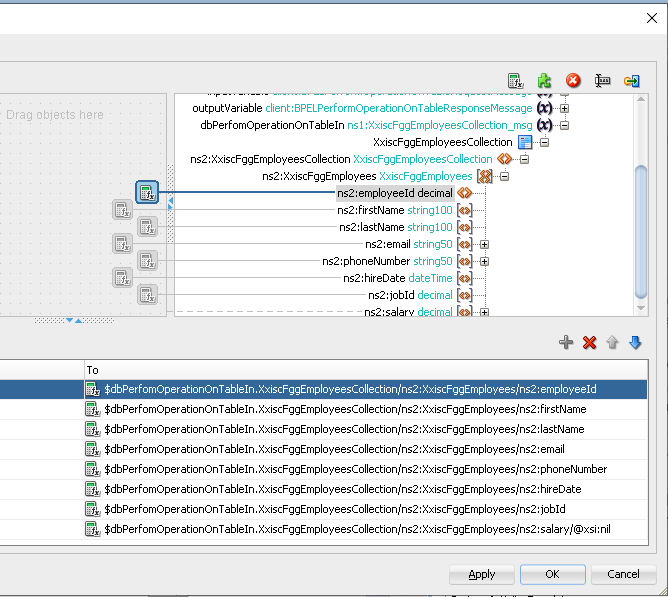
Now we need to double click on AssignPerformOperationOnTableIn activity.
On the Edit Assign window, set the next values, and click on Ok button.
| $dbPerfomOperationOnTableIn.XxiscFggEmployeesCollection/ns2:XxiscFggEmployees/ns2:employeeId | A |
| $dbPerfomOperationOnTableIn.XxiscFggEmployeesCollection/ns2:XxiscFggEmployees/ns2:firstName | B |
| $dbPerfomOperationOnTableIn.XxiscFggEmployeesCollection/ns2:XxiscFggEmployees/ns2:lastName | C |
| $dbPerfomOperationOnTableIn.XxiscFggEmployeesCollection/ns2:XxiscFggEmployees/ns2:email | D |
| $dbPerfomOperationOnTableIn.XxiscFggEmployeesCollection/ns2:XxiscFggEmployees/ns2:phoneNumber | E |
| $dbPerfomOperationOnTableIn.XxiscFggEmployeesCollection/ns2:XxiscFggEmployees/ns2:hireDate | F |
| $dbPerfomOperationOnTableIn.XxiscFggEmployeesCollection/ns2:XxiscFggEmployees/ns2:jobId | G |
| $dbPerfomOperationOnTableIn.XxiscFggEmployeesCollection/ns2:XxiscFggEmployees/ns2:salary | H |
Note: The values are an example, It's depends of your custom table
For example:
Now the next step is create a jar file to can deploy it on WebLogic Server, we need to select the PerformOperationOnTable project and righ click, then chose the PerformOperationOnTable... option.

On the Deployment Action window, set the next values, and click on next button.
| Deployment Action | Generate SAR File |
For example:

On the Deployment Configuration window, set the next values, and click on next button.
| New Revision ID | 1.0 |
For example:

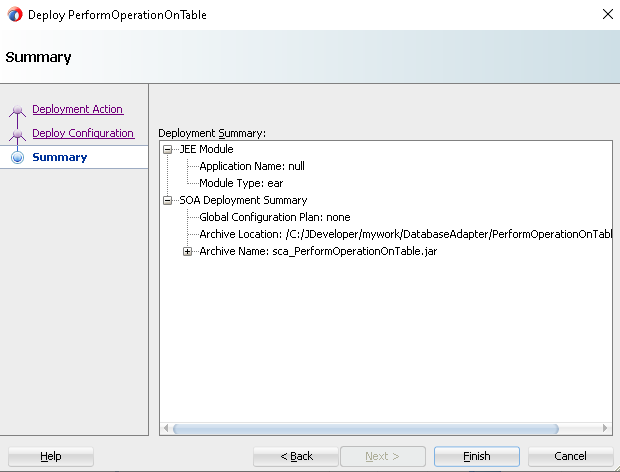
On the Deployment Summary window, click on Finish button.
For example:
If all steps were successful, then you will view on yours JDeveloper IDE the correctly deployment.
For example:


Comments
Post a Comment